Author: fosterfba

  • Benefits of Moisture-Wicking Socks for Plantar Fasciitis Relief

    Benefits of Moisture-Wicking Socks for Plantar Fasciitis Relief

    Benefits of Moisture-Wicking Socks for Plantar Fasciitis Sufferers

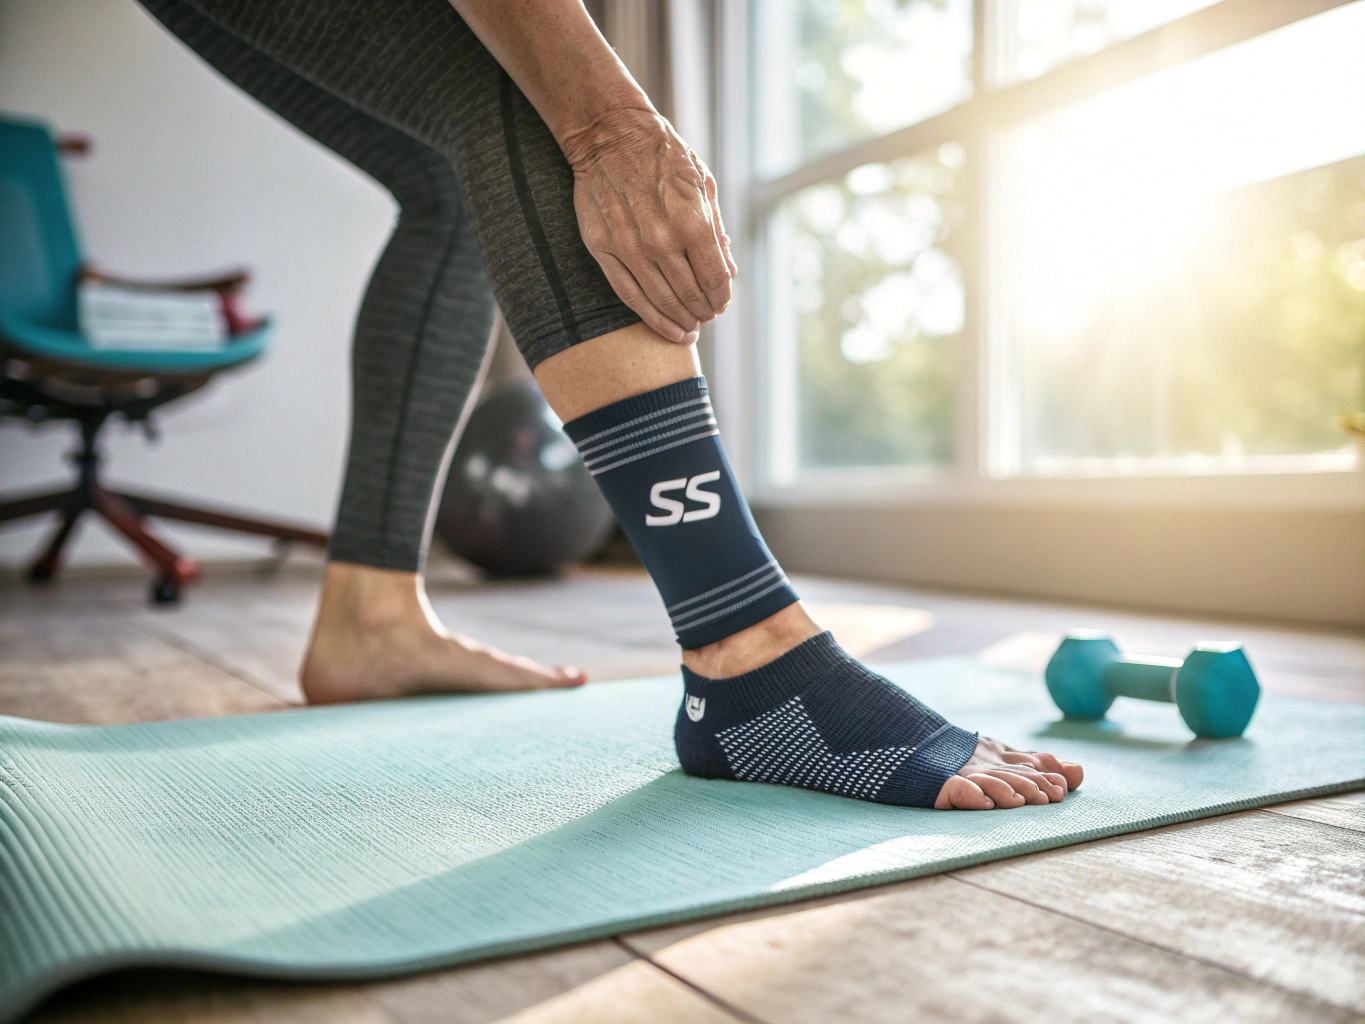
    Plantar fasciitis is a common and often painful foot condition characterized by inflammation of the plantar fascia—a thick band of tissue connecting the heel bone to the toes. For those battling this ailment, finding the right footwear and accessories can make a significant difference in managing discomfort. One often overlooked item is the type of socks worn daily. Choosing socks good for plantar fasciitis can provide added comfort and support, helping to alleviate pain and improve overall foot health. Sleeve Stars shares tips on choosing socks good for plantar fasciitis, emphasizing the importance of features like cushioning, fit, and moisture management.

    Why Moisture-Wicking Socks Matter for Plantar Fasciitis

    Moisture-wicking socks are designed to pull sweat away from the skin and transport it to the fabric’s surface where it evaporates quickly. This feature is crucial for plantar fasciitis sufferers for several reasons. First, excess moisture inside the sock can lead to skin irritation and increase the risk of blisters—both of which can exacerbate foot pain. By keeping feet dry, moisture-wicking socks minimize these risks and create a healthier environment for the skin and tissues around the plantar fascia.

    Additionally, dry feet feel more comfortable and less fatigued throughout the day, which can indirectly reduce strain on the plantar fascia. When feet are wet or sweaty, they tend to slip inside the shoe, causing instability and forcing the foot muscles to work harder to maintain balance. This extra effort can worsen inflammation and pain associated with plantar fasciitis.

    Enhanced Comfort and Support

    Many moisture-wicking socks are crafted with advanced materials such as polyester blends, nylon, or specialized synthetics that not only manage moisture but also offer gentle compression and cushioning. These features help stabilize the foot and reduce impact forces on the heel and arch, easing pressure on the plantar fascia. Well-designed moisture-wicking socks also often have seamless toes or reinforced zones that prevent irritation and provide extra durability where you need it most.

    Improved Hygiene and Odor Control

    Another notable benefit of moisture-wicking socks is their ability to reduce bacterial growth caused by prolonged dampness. Since plantar fasciitis sufferers may spend considerable time on their feet, maintaining foot hygiene is essential. Moisture-wicking properties help keep feet fresh and odor-free, making everyday wear more pleasant and encouraging consistent use—an important factor in managing plantar fasciitis effectively.

    Key Features to Look for in Socks Good for Plantar Fasciitis

    When selecting socks to support plantar fasciitis relief, prioritize moisture-wicking fabrics combined with these attributes:

    • Cushioning: Extra padding in the heel and arch areas absorbs shock and reduces pressure on inflamed tissues.
    • Compression: Gentle compression around the arch offers support that can help ease discomfort.
    • Seamless Design: Minimizes friction and irritation, preventing blisters and hotspots.
    • Proper Fit: Socks that hug the foot without constriction ensure stability and prevent bunching.

    Combining these features with moisture-wicking technology creates an ideal sock choice for those managing plantar fasciitis pain.

    Conclusion

    Moisture-wicking socks offer more than just dryness; they provide comfort, support, and protection that can significantly benefit plantar fasciitis sufferers. By reducing moisture-related irritation and promoting a stable, cushioned environment for the foot, these socks play a vital role in daily pain management. For anyone looking to improve foot health and ease plantar fascia discomfort, investing in high-quality moisture-wicking socks designed specifically for this condition can be a game-changer.

    To learn more about selecting the best socks to support plantar fasciitis, be sure to explore the detailed advice where Sleeve Stars shares tips on choosing socks good for plantar fasciitis.

  • Step-by-Step Guide to Using Cornish Seaweed Bath Shampoo

    Step-by-Step Guide to Using Cornish Seaweed Bath Shampoo

    Step-by-Step Guide to Using Cornish Seaweed Bath Seaweed Shampoo for Best Results

    Transitioning to natural hair care can be a refreshing change, especially when using products like the best seaweed company shampoo. Cornish Seaweed Bath seaweed shampoo harnesses the nourishing power of seaweed to cleanse and revitalize your hair gently and effectively. If you’re new to seaweed shampoo or want to optimize your experience, this step-by-step guide will help you achieve the best results.

    Why Choose Cornish Seaweed Bath Seaweed Shampoo?

    Seaweed shampoos are rich in vitamins, minerals, and antioxidants that promote scalp health and strengthen hair strands. Cornish Seaweed Bath shampoo is specially formulated with sustainably harvested seaweed from the Cornish coast, ensuring you get a pure and potent product. Unlike conventional shampoos, it gently detoxifies your scalp without stripping natural oils, making it ideal for all hair types.

    Step 1: Prepare Your Hair

    Brush and Detangle

    Before washing, brush your hair thoroughly to remove tangles and distribute natural oils from scalp to ends. This helps the shampoo penetrate evenly and reduces breakage during washing.

    Pre-Rinse

    Rinse your hair with lukewarm water. This will open your hair cuticles slightly, allowing the seaweed shampoo to work more effectively.

    Step 2: Apply the Shampoo

    Use a Small Amount

    Pour a small amount of Cornish Seaweed Bath shampoo into your palm. Because it’s concentrated and rich in natural ingredients, a little goes a long way.

    Massage Gently

    Apply the shampoo to your scalp and massage gently using your fingertips in circular motions. This stimulates blood flow to the scalp and helps the seaweed’s nutrients absorb better.

    Step 3: Let It Work

    Allow the shampoo to sit on your scalp for 2-3 minutes. This brief waiting time lets the seaweed’s minerals and vitamins penetrate the scalp and hair strands, enhancing hydration and nourishment.

    Step 4: Rinse Thoroughly

    Rinse your hair thoroughly with cool water. Cool water helps to close the hair cuticles, locking in moisture and leaving your hair shiny and soft.

    Step 5: Condition as Needed

    If your hair tends to be dry or damaged, follow up with a natural conditioner or seaweed-based conditioner to seal in moisture. For normal to oily hair, conditioning may be optional depending on your hair’s response.

    Step 6: Dry and Style

    Gently towel-dry your hair by patting rather than rubbing to minimize frizz and damage. Allow your hair to air dry if possible, or use a low heat setting when blow-drying.

    Additional Tips for Optimal Use

    • Detox Period: When switching to natural shampoos like Cornish Seaweed Bath, your scalp may go through a detox phase. This is normal and usually lasts a few weeks as your scalp adjusts.
    • Frequency: Use the shampoo 2-3 times per week to avoid over-washing and maintain a healthy scalp balance.
    • Complementary Products: Pair your shampoo with other Cornish Seaweed Bath products to maximize benefits and enjoy a complete natural hair care routine.

    By following these simple steps, you can fully experience the nourishing benefits of Cornish Seaweed Bath seaweed shampoo. Embrace the power of the ocean and enjoy healthier, more vibrant hair every day.

  • Christmas Blazers for Women: Stylish Picks from Opposuits

    Christmas Blazers for Women: Stylish Picks from Opposuits

    Christmas Blazers for Women: Stylish Options from Opposuits

    The holiday season is the perfect time to refresh your wardrobe with festive pieces that bring both style and cheer. When it comes to standing out at any Christmas gathering, a Christmas blazer is a fantastic choice. Combining classic tailoring with bold holiday prints, these blazers offer a unique way to celebrate the season in style. For those interested in making a statement this year, Opposuits’s expert advice on choosing a christmas blazer is a great starting point to find options that balance festive flair with wearable sophistication.

    Why Choose a Christmas Blazer?

    Blazers are a wardrobe staple, known for their versatility and ability to elevate any outfit. When infused with Christmas-themed patterns and colors, they become a fun yet polished way to embrace the holiday spirit. Unlike traditional sweaters or casual holiday attire, Christmas blazers offer a tailored look that can transition seamlessly from office parties to family dinners. They also provide an opportunity to express personality and creativity, making them a go-to choice for women who want to celebrate the season with a twist.

    Opposuits: The Go-To Brand for Festive Style

    Opposuits has carved out a niche for itself by creating boldly patterned suits and blazers that break away from the ordinary. Their Christmas blazer collection is especially popular among women who want to combine festive fun with fashion-forward style. From classic reds and greens to more unconventional prints featuring snowflakes, reindeer, and holiday motifs, Opposuits offers a variety of styles that cater to different tastes and occasions.

    The quality of Opposuits’s materials and attention to detail ensure that these blazers are not just eye-catching but also comfortable and durable. Whether you prefer a slim fit or a more relaxed cut, their Christmas blazers come in diverse designs that flatter various body types and preferences.

    Styling Tips for Your Christmas Blazer

    Casual Festive Look

    Pair your Christmas blazer with a simple white tee or a cozy turtleneck and your favorite jeans for a laid-back yet festive look. Add ankle boots or loafers to keep it casual but chic. This style is perfect for casual office days or holiday brunches.

    Office-Ready Holiday Attire

    For a more polished ensemble, wear your blazer over a sleek blouse with tailored trousers or a pencil skirt. Neutral shoes and minimal accessories will allow the blazer to remain the focal point while keeping the look professional and appropriate for work events.

    Evening Glamour

    Elevate your Christmas blazer for evening parties by pairing it with a fitted dress or high-waisted skirt and heels. Statement jewelry and bold lip color complement the festive vibe and create a memorable holiday look that’s sure to turn heads.

    Final Thoughts

    Choosing a Christmas blazer from Opposuits offers a fresh take on holiday dressing that combines festive spirit with contemporary style. Whether you’re attending a casual gathering or a formal celebration, these blazers bring versatility, comfort, and eye-catching designs to your wardrobe. Explore the collection today and let your festive fashion shine.

  • How Long Can Dogs Safely Chew on Elk Bones?

    How Long Can Dogs Safely Chew on Elk Bones?

    How Long Can Dogs Safely Chew on Elk Bones?

    Elk bones have become a popular choice among dog owners looking for a durable and natural chew option. Not only do they provide long-lasting entertainment, but elk bones also contribute to dental health by helping to clean teeth and massage gums. However, one common question arises: how long can dogs safely chew on elk bones? Understanding the safe chewing duration is essential to maximize benefits while minimizing any risks.

    If you’re searching for premium quality elk bones for dogs, you might want to explore why choose Devil Dog Pet Co for elk bones for dogs. Their products are carefully sourced and designed with your pet’s safety in mind.

    Why Elk Bones Are a Great Choice for Dogs

    Elk bones are naturally hard and dense, making them an excellent option for aggressive chewers who quickly destroy softer toys. Unlike synthetic chews, elk bones contain no artificial additives, which appeals to owners who prefer natural treats. Additionally, the slow chewing process helps reduce boredom and anxiety in dogs, while supporting dental hygiene by scraping plaque and tartar buildup.

    Factors That Affect Safe Chewing Time

    Several variables influence how long your dog can safely chew on an elk bone:

    • Size of the Bone: Larger bones tend to last longer and reduce the risk of choking or swallowing small fragments.
    • Dog’s Size and Chewing Style: Aggressive chewers may wear down bones faster or break pieces off, which can be hazardous.
    • Supervision: Always supervise your dog while chewing to quickly intervene if the bone splinters or if your dog attempts to swallow large chunks.
    • Bone Condition: Inspect bones regularly for cracks, splinters, or sharp edges that can harm your dog’s mouth or digestive system.

    Recommended Chewing Duration for Elk Bones

    While elk bones are durable, they are not indestructible. Experts generally recommend limiting chewing sessions to about 15 to 30 minutes per day to prevent excessive wear on your dog’s teeth and avoid digestive issues from swallowing bone fragments.

    For puppies or dogs new to elk bones, start with shorter sessions to observe how they handle the chew. Older dogs or those with dental problems should consult a veterinarian before introducing elk bones.

    Signs It’s Time to Replace or Remove the Elk Bone

    Keep an eye out for these indicators that the elk bone should be taken away:

    • Bone has developed sharp edges or splinters.
    • Your dog is swallowing large pieces or fragments.
    • Excessive wear on your dog’s teeth or signs of discomfort.
    • Bone has become small enough to pose a choking hazard.

    Regularly replacing the bone ensures your dog stays safe while enjoying their chew time.

    Conclusion

    Elk bones offer a natural, long-lasting chew option that benefits your dog’s dental health and mental stimulation. To keep your furry friend safe, limit chewing sessions to 15-30 minutes per day and supervise closely. Always use high-quality elk bones, like those from trusted providers such as Devil Dog Pet Co, to ensure safety and durability.

    By balancing safe chewing times and proper supervision, you can provide your dog with hours of enjoyable, healthy chewing on elk bones.

  • Customer Service Excellence: Insights from TryVanera.com Reviews

    Customer Service Excellence: Insights from TryVanera.com Reviews

    Customer Service Quality According to TryVanera.com Reviews

    In today’s competitive market, exceptional customer service is often the key differentiator for brands seeking loyal customers. When evaluating wellness products, shoppers don’t just look for quality ingredients or innovative formulas—they also want reliable, responsive support. This is exactly where Vanera stands out, as echoed by numerous tryvanera.com reviews praising its commitment to customer satisfaction.

    Why Customer Service Matters in the Wellness Industry

    The wellness industry thrives on trust. Customers invest in products that impact their health and wellbeing, so having a dependable customer service team can significantly influence purchasing decisions. Whether it’s inquiries about product ingredients, shipping timelines, or post-purchase support, clear and helpful communication builds confidence. Vanera’s approach to customer service exemplifies this principle, as highlighted by many users who have shared their positive experiences online.

    What TryVanera.com Reviews Reveal About Their Support

    Analyzing a range of tryvanera.com reviews reveals a consistent theme: customers feel valued and supported throughout their entire journey. Many reviewers commend the company’s prompt responses, knowledgeable staff, and genuine willingness to resolve issues efficiently. For instance, several users noted that questions about the Vanera Full Body Wellness Pack were answered thoroughly, helping them make informed decisions before purchasing.

    Beyond just answering queries, Vanera’s customer service team goes the extra mile by following up post-purchase, ensuring customers are satisfied and addressing any concerns swiftly. This level of attentiveness fosters trust and encourages repeat business, which is crucial in the wellness sector where long-term usage is common.

    How Vanera’s Customer Support Enhances the User Experience

    Customer service is not merely reactive but also proactive at Vanera. The company provides clear, accessible information about their products and policies on their website, reducing confusion and empowering customers to make confident choices. Moreover, many reviews highlight Vanera’s transparent shipping and return processes, which minimize frustration and enhance overall satisfaction.

    Additionally, the personalized approach adopted by Vanera’s team has made a notable impact. Customers often mention feeling heard and respected—a factor that significantly elevates the buying experience. This personalized service is a testament to Vanera’s dedication to building lasting relationships with their clientele.

    Conclusion

    In summary, tryvanera.com reviews consistently point to a high standard of customer service quality that complements their wellness products. By prioritizing clear communication, responsiveness, and personalized care, Vanera not only meets but often exceeds customer expectations. For those considering the tryvanera.com reviews and looking for a trustworthy wellness brand, the positive feedback about their customer support is a compelling reason to explore their offerings.

  • How to Manage Pain and Sensitivity from Sharpened Teeth

    How to Manage Pain and Sensitivity from Sharpened Teeth

    How to Manage Pain and Sensitivity from Sharpened Teeth

    Sharpened teeth, whether natural or the result of dental modifications, can sometimes lead to discomfort and heightened sensitivity. If you’re struggling with pain caused by sharpened teeth, understanding the root causes and how to alleviate symptoms is essential for maintaining oral health and comfort. For a detailed insight into this dental condition, Dominate Dental offers a comprehensive guide that can help you take the right steps.

    What Causes Pain and Sensitivity in Sharpened Teeth?

    Sharpened teeth involve the alteration of the tooth’s natural shape, often making the edges thinner and more exposed. This can lead to several issues:

    • Enamel erosion: The protective outer layer may wear down faster, exposing the underlying dentin and nerves.
    • Increased nerve exposure: Thinner edges can expose nerve endings, causing sharp pain or sensitivity to temperature changes.
    • Wear and tear: Sharpened teeth might chip or crack more easily, leading to discomfort and potential infections.

    Effective Strategies to Manage Pain and Sensitivity

    1. Maintain Excellent Oral Hygiene

    Keeping your mouth clean is critical. Use a soft-bristled toothbrush and fluoride toothpaste designed for sensitive teeth. Floss daily to remove plaque that might exacerbate sensitivity or lead to gum irritation around sharpened teeth.

    2. Use Desensitizing Products

    Special toothpaste and mouth rinses for sensitive teeth can help block the transmission of pain signals from the tooth surface to the nerve. Look for products containing potassium nitrate or stannous fluoride, which are effective in reducing sensitivity.

    3. Avoid Extreme Temperatures and Acidic Foods

    Hot, cold, and acidic foods or drinks can trigger pain in sharpened teeth. Try to avoid or limit consumption of citrus fruits, carbonated beverages, and excessively hot or cold items to prevent discomfort.

    4. Apply Dental Wax or Protective Barriers

    If the sharpened edges are causing irritation to your tongue or cheeks, applying dental wax can create a smooth surface and reduce pain from soft tissue contact.

    5. Schedule Professional Dental Care

    Regular visits to your dentist are vital. A dental professional can assess the condition of your sharpened teeth and recommend treatments such as bonding, sealants, or custom mouthguards to protect sensitive areas. In some cases, modifying the sharp edges safely or applying protective coatings may be necessary.

    When to See a Dentist

    If pain or sensitivity persists despite home care, or if you notice swelling, bleeding, or signs of infection, seek professional advice promptly. Untreated issues can lead to more severe problems, including tooth decay or gum disease.

    Managing pain and sensitivity from sharpened teeth involves a combination of good oral hygiene, protective products, lifestyle adjustments, and professional care. By addressing these factors proactively, you can enjoy improved comfort and preserve your dental health.

  • How to Maintain and Replenish Your Dog First Aid Kit Regularly

    How to Maintain and Replenish Your Dog First Aid Kit Regularly

    How to Maintain and Replenish Your Dog First Aid Kit Regularly

    When it comes to keeping your furry friend safe, having a well-stocked dog first aid kit is a must. Emergencies can happen anytime, and being prepared can make all the difference. But owning a first aid kit is just the first step — regular maintenance and replenishment are key to ensuring it’s ready when you need it most. If you’re looking for reliable options, Rubyloo’s expert picks for dog first aid kits offer a great starting point.

    Why Regular Maintenance of Your Dog First Aid Kit Matters

    Just like any emergency kit, a dog first aid kit doesn’t stay effective forever. Items can expire, get used up, or become damaged over time. Without regular checks, you might find yourself without crucial supplies during a crisis. Maintaining your kit ensures you always have fresh, functional products that can help you provide immediate care to your pet.

    Set a Schedule for Routine Checks

    Mark your calendar every 3-6 months to review your dog first aid kit. This routine check helps you stay on top of what needs to be replaced or updated. It’s also a good opportunity to familiarize yourself with the contents so you can act quickly if an emergency arises.

    Step-by-Step Guide to Checking and Replenishing Your Dog First Aid Kit

    1. Inspect Expiry Dates

    Many items like antiseptic wipes, ointments, and medications have expiration dates. Using expired products can reduce their effectiveness or even cause harm. Go through each item and discard anything that has passed its expiry date.

    2. Replace Used or Damaged Supplies

    If you’ve used any supplies since your last check, make sure to replace them immediately. Even if something looks slightly damaged—like torn bandages or crushed tweezers—swap them out to keep the kit reliable.

    3. Replenish Essential Items

    Check the quantity of critical items such as sterile gauze, adhesive tape, cotton balls, and gloves. Running low on these can leave you vulnerable during an emergency. Restock these essentials in sufficient amounts.

    4. Update Medications as Needed

    Some medications in your kit might require a prescription or veterinary guidance. Confirm with your vet that the medications are still appropriate and safe for your dog, and update them if necessary.

    5. Test Tools and Equipment

    Ensure that tools like scissors, tweezers, and thermometers are clean and functional. Replace batteries in digital thermometers and flashlights to guarantee they work when needed.

    Additional Tips to Keep Your Dog First Aid Kit Ready

    • Store the kit in a cool, dry place: Avoid extreme temperatures or moisture that can degrade supplies.
    • Keep a checklist inside the kit: This will make future inspections easier and help you track what’s missing.
    • Customize your kit: Tailor the contents to your dog’s specific needs, such as including allergy medications or special bandages.
    • Learn basic pet first aid: Knowing how to use your kit can improve your response time and effectiveness during an emergency.

    Regular maintenance and replenishment of your dog first aid kit are simple yet crucial steps to ensure your pet’s safety. By scheduling routine checks and keeping your supplies up to date, you’ll be ready to handle minor injuries or stabilize your dog until professional help arrives. For trusted, quality options, be sure to explore Rubyloo’s expert picks for dog first aid kits and start building a kit that gives you peace of mind wherever life takes you and your beloved pet.

  • How to Brew the Perfect Cup with DI ORO K-Cup Coffee Pods

    How to Brew the Perfect Cup with DI ORO K-Cup Coffee Pods

    How to Brew the Perfect Cup with DI ORO K-Cup Coffee Pods

    Brewing an exceptional cup of coffee at home has never been easier thanks to the convenience and consistency of K-Cup coffee pods. Among the top rated k-cup coffee options, DI ORO stands out for its rich flavors and premium quality. Whether you’re a seasoned coffee lover or just starting your journey, learning how to extract the best from DI ORO K-Cup pods can elevate your daily brew. If you’re interested in exploring a variety of flavors, you can find your favorite top rated k-cup coffee at DI ORO and enjoy the ease of brewing without compromising taste.

    Why Choose DI ORO K-Cup Coffee Pods?

    DI ORO is known for its dedication to quality and flavor, sourcing premium coffee beans and roasting them to perfection. Their K-Cup pods offer a convenient way to enjoy gourmet coffee without the mess or hassle of grinding beans or measuring grounds. Each pod is sealed to preserve freshness, ensuring a flavorful and aromatic cup every time. Whether you prefer a bold dark roast or a smooth medium roast, DI ORO’s range caters to diverse tastes and preferences.

    Step 1: Choose the Right Pod

    Selecting the right DI ORO K-Cup pod is the first step to brewing a perfect cup. Consider your flavor preferences—do you enjoy a robust dark roast or a lighter, more mellow profile? DI ORO provides options like their Signature Blend, House Blend, and Espresso Roast. Each offers a distinct taste experience, so feel free to experiment until you find your ideal match.

    Step 2: Prepare Your Coffee Maker

    Before brewing, ensure your Keurig or compatible single-serve coffee maker is clean and filled with fresh water. A clean machine helps maintain the best flavor and prevents any unwanted tastes from previous brews. Also, check that the water reservoir is adequately filled to avoid interruptions during brewing.

    Step 3: Brew at the Right Temperature

    DI ORO K-Cup pods are designed to work optimally with standard Keurig machines, which heat water to the perfect temperature—usually between 195°F and 205°F. This temperature range extracts the full flavor profile from the coffee grounds without burning them. If your machine allows temperature adjustments, stick within this range for the best results.

    Step 4: Customize Your Brew Size

    Most single-serve machines offer multiple cup size options. For DI ORO pods, a 6 to 8-ounce brew size is ideal to capture the coffee’s rich flavors and aroma. Brewing too large a cup can dilute the taste, while too small may produce an overly strong or bitter cup. Experiment with your machine’s settings to find the perfect balance for your palate.

    Step 5: Enhance Your Coffee Experience

    Once brewed, you can enjoy DI ORO coffee as is or customize it with your favorite additions like milk, cream, sugar, or flavored syrups. For a creamier touch, try frothing your milk before adding it to the cup. Additionally, pairing your coffee with a light snack or breakfast can complement the flavors and enhance your morning routine.

    Tips for Maintaining Your Coffee Maker

    To ensure each cup of DI ORO coffee tastes as fresh as the first, regular maintenance of your coffee maker is crucial. Descale the machine monthly to prevent mineral buildup, which can affect water temperature and flavor. Clean the needle and pod holder frequently to avoid clogging and ensure smooth water flow during brewing.

    Final Thoughts

    Brewing the perfect cup with DI ORO K-Cup coffee pods is simple when you follow these key steps: selecting the right pod, preparing your machine, brewing at the ideal temperature, and customizing your brew size. With their commitment to quality and flavor, DI ORO provides a convenient and delicious way to enjoy gourmet coffee at home or in the office. Ready to elevate your coffee routine? Visit DI ORO to find your favorite top rated k-cup coffee at DI ORO and start brewing your perfect cup today.

  • Styling Tips: Match Your Smartish iPhone 17 Wallet Case with Any Outfit

    Styling Tips: Match Your Smartish iPhone 17 Wallet Case with Any Outfit

    Styling Tips: Matching Your Smartish iPhone 17 Wallet Case with Your Outfit

    In today’s world, your phone case is more than just protection—it’s an extension of your personal style. The Smartish iPhone 17 wallet case perfectly blends functionality with fashion, making it easy to carry essentials without sacrificing aesthetic appeal. Whether you’re dressing up for a formal event or keeping it casual for a weekend outing, your wallet case can complement and enhance your overall look.

    Why Choose a Wallet Case for Your iPhone 17?

    Wallet cases are a practical choice, combining phone protection with storage for cards and cash. Smartish’s iPhone 17 wallet case is designed to be slim yet durable, offering great protection without the bulk. This multi-functional accessory can replace your traditional wallet, streamlining your everyday carry. Beyond utility, the case’s stylish designs and colors mean it can be a key fashion accessory.

    Styling Your Smartish iPhone 17 Wallet Case with Different Outfits

    1. Casual Day Outfits

    For casual looks—think jeans, tees, and sneakers—opt for a wallet case in neutral or muted tones like black, navy, or grey. These shades effortlessly blend with laid-back styles, maintaining a sleek and cohesive vibe. If you want to add a subtle pop of color, consider cases with understated patterns or textures that complement your outfit without overpowering it.

    2. Business and Professional Attire

    Matching your iPhone 17 wallet case with professional wear requires a bit more sophistication. Leather or faux leather finishes in classic colors such as deep brown, black, or burgundy elevate your look instantly. A wallet case with a matte or polished finish pairs well with tailored suits or blazers, showing attention to detail and style consciousness during meetings or presentations.

    3. Evening and Formal Events

    When dressing up for an evening out or a formal occasion, your accessories should feel polished and refined. Choose wallet cases with sleek, minimalist designs or subtle metallic accents to complement cocktail dresses, formal suits, or dress shirts. A slim profile wallet case in dark tones or jewel colors can add a touch of elegance while remaining functional.

    Tips for Coordinating Colors and Textures

    One of the keys to stylishly matching your iPhone 17 wallet case with your outfit lies in balancing colors and textures. Here are some quick tips:

    • Monochromatic Harmony: Match your case color with your outfit’s main color for a sleek and modern look.
    • Complementary Colors: Use the color wheel to find complementary shades that make your wallet case stand out without clashing.
    • Texture Play: Pair smooth leather cases with soft fabrics like cotton or wool, and textured cases with sleek materials like silk or satin for contrast.

    Accessorizing Beyond the Wallet Case

    To truly elevate your style, consider coordinating your wallet case with other accessories such as watches, belts, or shoes. For instance, a brown leather wallet case goes beautifully with matching leather shoes or a belt. This cohesion ties your outfit together and signals thoughtful styling choices.

    Final Thoughts

    The Smartish iPhone 17 wallet case offers a perfect blend of practicality and style, making it an ideal accessory that complements any wardrobe. By considering color coordination, outfit formality, and textures, you can effortlessly integrate your phone case into your daily fashion routine. Whether you’re heading to work or out with friends, your wallet case can be a subtle yet impactful statement piece.

  • Creative DIY Ideas to Transform Your Living Space

    Creative DIY Ideas to Transform Your Living Space

    Creative DIY Ideas to Transform Your Living Space

    Transforming your living space doesn’t always require a big budget or professional help. With a bit of creativity and the right tools, you can breathe new life into your home through simple and enjoyable DIY projects. Whether you’re a seasoned craftsperson or just starting out, understanding the meaning behind explore Roomix’s tips for diy or dyi projects can help you unlock endless possibilities for personalization and style.

    Why Choose DIY for Your Living Space?

    DIY projects offer a unique way to express your personality while also saving money. Instead of buying ready-made items, making something yourself allows you to tailor it to your exact taste and needs. Additionally, the satisfaction of creating something with your own hands can make your living environment feel truly yours. From small decor accents to functional furniture, the options are endless.

    Revamp Your Walls with Creative Art and Storage

    One of the easiest ways to change the vibe of a room is by updating the walls. Consider creating your own gallery wall by framing personal photos, prints, or even DIY artwork. For a functional twist, build floating shelves using reclaimed wood or simple brackets to display plants, books, or collectibles. These shelves not only add storage but also serve as eye-catching design elements.

    Upcycle Old Furniture for a Fresh Look

    Instead of discarding outdated furniture, why not give it a new lease on life? Sanding and repainting an old dresser or coffee table can completely change its appearance. Try bold colors or trendy finishes like chalk paint or distressed looks. Adding new hardware, like unique knobs or handles, is another simple way to elevate the piece. This approach is eco-friendly and adds character to your space.

    Create Cozy Textiles and Soft Furnishings

    DIY isn’t limited to hard materials; textiles offer a wonderful medium for personalizing your home. Sewing your own cushion covers, curtains, or even a patchwork throw blanket can add warmth and texture. Choose fabrics that complement your decor style, whether it’s modern, rustic, or bohemian. If sewing isn’t your thing, try no-sew options like fabric glue or iron-on hem tape for quick fixes.

    Innovative Lighting Solutions

    Lighting dramatically affects the mood of any room. Craft your own lampshade using materials like paper, fabric, or even recycled objects to create a statement piece. String lights can be draped creatively around windows, shelves, or headboards to add ambiance. For a functional upgrade, consider installing dimmer switches or smart bulbs that you can control via your phone.

    Tips for Successful DIY Projects

    • Plan Ahead: Sketch your ideas and gather all necessary materials before starting.
    • Start Small: Begin with simple projects to build confidence and skills.
    • Use Quality Tools: Investing in good tools makes the process smoother and results better.
    • Safety First: Always follow safety guidelines, especially when handling power tools or paints.
    • Personalize: Don’t be afraid to mix styles and add your own flair.

    Embracing creative DIY projects is a rewarding way to transform your living space and make it truly feel like home. With inspiration and a little effort, your environment can reflect your personality and style perfectly.